The Connector Update Service failed to check for an update. If this error persists, please use the following link to verify that all necessary ports are open in your firewall: https://go.microsoft.com/fwlink/?linkid=843463. For more details, please see our troubleshooting page: http://go.microsoft.com/fwlink/?LinkID=512316&clcid=0x409. Additional details: ‘Unable to connect to the remote server’.

Hi Guys,

I have been working with Microsoft Azure AD Application Proxy connector lately to publish Applications in the Azure and I came across an issue that although the Microsoft Azure AD Application Proxy connector was installed and running on the on-premise server, it was not fully functional with the Microsoft Azure AD Application Proxy portal.

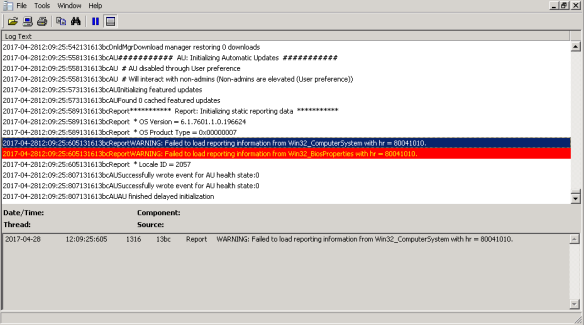
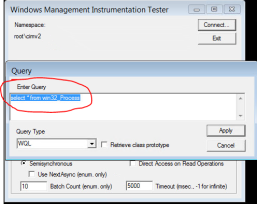
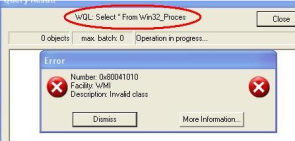
Error location: Event Viewer> Applications and services logs>Microsoft>AadApplicationProxy>Updater

Error log: The Connector Update Service failed to check for an update.
If this error persists, please use the following link to verify that all necessary ports are open in your firewall: https://go.microsoft.com/fwlink/?linkid=843463.
For more details, please see our troubleshooting page: http://go.microsoft.com/fwlink/?LinkID=512316&clcid=0x409.
Additional details: ‘Unable to connect to the remote server’.


Root cause: once you install the Microsoft Azure AD Application Proxy connector, its adds 2 Services to your host server the Microsoft AAD Application Proxy Connector and the Microsoft AAD Application Proxy Connector Updater.


However it appears that the Microsoft AAD Application Proxy Connector Updater service requires access to the Service Bus control channels that the connector service uses also require connectivity to specific IP addresses. This is the official line from Microsoft until Service Bus moves to an FQDN instead. My client was not happy but here are the options to resolve the issue.

Solution: There are two solutions

  • Configure connectors config to bypass your on-premises outbound proxies.
  • Configure connectors config to use an outbound proxy to access Azure AD Application Proxy.

This is the official Microsoft Link for Configuring both options: Application-proxy-working-with-proxy-servers

However what I found was that you are better off using a bit of both during the installation of the Azure AD Application Proxy connector because most proxy solution like Bluecoat, you can whitelist the URLs but not the IP range.

Actually more Urls popped up than Microsoft has listed because the Urls keep bouncing from one domain to another which is secure but hard to manage.

  1. //management.azure.com/
  2.  //*.azure.com/
  3.  //*.microsoftonline.com/
  4.  //login.microsoftonline.com/
  5.  //login.windows.net/
  6.  //*.microsoft.com/
  7.  //portal.azure.com/
  8.  //www.microsoft.com/
  9.  //microsoft.com/
  10.  //symcb.com/
  11.  //ocsp.verisign.com/
  12.  //crl.verisign.com/
  13.  //symcd.com/
  14.  //*.msappproxy.net/
  15. //*.servicebus.windows.net

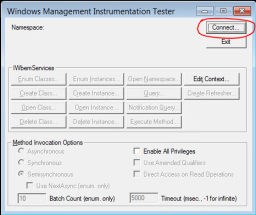
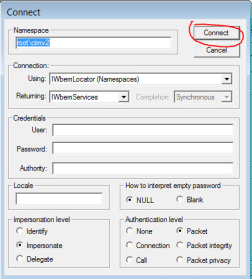
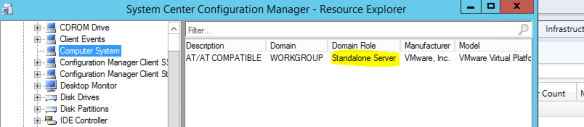
Once you verify that the Connector services has installed successfully and Running.

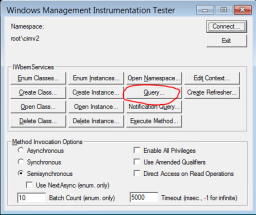
Check that both Service have installed


Then you need to Allow the connector outbound access to Azure datacenter IP ranges. from your Azure Application Proxy connector server only for Security reason obviously.

Only then will the Azure AD Application Proxy Connector work with the Azure AD Application Proxy service.

“WARNING: Failed to load reporting information from Win32_ComputerSystem with hr = 80041010 and WARNING: Failed to load reporting information from Win32_BiosProperties with hr = 80041010”.

Capture

So I naturally tried to access Win32_ComputerSystem WMI class using a Wbemtest but I was getting an Invalid class error


Capture

Capture

Capture

Capture

Capture

This looked like a corrupt WMI repository.
use CMD to run command
net stop winmgmt
select Yes or Y
sc config winmgmt start= disabled
cd %windir%\system32\wbem
for /f %s in (‘dir /b *.dll’) do regsvr32 /s %s
for /f %s in (‘dir /b *.mof’) do mofcomp %s
wmiprvse /regserver
sc config winmgmt start= auto

give it a few minutes to complete then restart server.

VBS script can also be used this cover the entire C:\ drive

Create a RebuildWMI.vbs file then copy and paste the following script give it a good 15 minutes.

set osh = createobject(“wscript.shell”)
set fso = createobject(“scripting.filesystemobject”)

ret = osh.run(“sc stop iphlpsvc”,0,true)
ret = osh.run(“sc config winmgmt start= disabled”)
ret = osh.run(“sc stop winmgmt”,0,true)

bp = osh.popup(“Service stop returned ” & ret & “. Continue?” & vbcrlf & vbcrlf & “Ensure that WMI has stopped before continuing”,,”Continue?”,33)
if bp <> 1 then wscript.quit

if fso.folderexists(“c:\windows\system32\wbem\repository.old”) then
fso.deletefolder(“c:\windows\system32\wbem\repository.old”)
end if

if fso.folderexists(“c:\windows\system32\wbem\repository”) then
set rfol = fso.getfolder(“c:\windows\system32\wbem\repository”)
rfol.name = “repository.old”
end if

set rfol = fso.getfolder(“c:\windows\system32\wbem”)

for each fil in rfol.files
if right(lcase(fil.name),4) = “.dll” then
osh.run “regsvr32 /s “”” & fil.path & “”””,0,true
end if
next

ret = osh.run(“sc config winmgmt start= auto”)
ret = osh.run(“sc start winmgmt”,0,true)

bp = osh.popup(“Service start returned ” & ret & “. Continue?” & vbcrlf & vbcrlf & “Ensure that WMI has started before continuing”,,”Continue?”,33)
if bp <> 1 then wscript.quit

set rfol = fso.getfolder(“c:\”)

recur rfol

Msgbox “WMI rebuild complete. Reboot server”

sub recur(fol)
on error resume next
if lcase(fol.name) <> “system volume information” and lcase(fol.name) <> “recycler” and lcase(fol.name) <> “boot” and lcase(fol.name) <> “$recycle.bin” then
for each fil in fol.files
if right(lcase(fil.name),4) = “.mof” or right(lcase(fil.name),4) = “.mfl” then
osh.run “mofcomp “”” & fil.path & “”””,1,true
end if
next
for each sfol in fol.subfolders
recur sfol
next
end if
end sub
Run the script at every prompt give a good 15 minutes before it completes the process

have a look at windowsupdate.log file again and it should be sweet with no errors


SCCM Device Collections with Workgroup Servers or Workstations

For all Workgroup Windows Servers and workstation I used this queries below, the key thing is I queried the variable found in the resource Explorer Domain Role and Operating system Name & version %server% or %Workstation%.

The domain Role attribute class value classifies the status of the devices there are 5 classes please see list below.

Computer System – Domain Role

0              Standalone Workstation

1              Member Workstation

2              Standalone Server

3              Member Server

4              Backup Domain Controller

5              Primary Domain Controller

I have used SMS_G_System_COMPUTER_SYSTEM.DomainRole. The attribute class is Computer System and the attribute is Domain Role for Workgroup devices are Standalone Server but I also used SMS_R_System.OperatingSystemNameandVersion like to isolate the collection type with a %server% or %workstation% wildcard.

Capture

All Workgroup Windows Servers (Works)

select SMS_R_SYSTEM.ResourceID,SMS_R_SYSTEM.ResourceType,SMS_R_SYSTEM.Name,SMS_R_SYSTEM.SMSUniqueIdentifier,SMS_R_SYSTEM.ResourceDomainORWorkgroup,SMS_R_SYSTEM.Client from SMS_R_System inner join SMS_G_System_COMPUTER_SYSTEM on SMS_G_System_COMPUTER_SYSTEM.ResourceID = SMS_R_System.ResourceId where SMS_R_System.OperatingSystemNameandVersion like “%Server%” and SMS_G_System_COMPUTER_SYSTEM.DomainRole in (2)

All Workgroup Windows Workstation (Works)

select SMS_R_SYSTEM.ResourceID,SMS_R_SYSTEM.ResourceType,SMS_R_SYSTEM.Name,SMS_R_SYSTEM.SMSUniqueIdentifier,SMS_R_SYSTEM.ResourceDomainORWorkgroup,SMS_R_SYSTEM.Client from SMS_R_System inner join SMS_G_System_COMPUTER_SYSTEM on SMS_G_System_COMPUTER_SYSTEM.ResourceID = SMS_R_System.ResourceId where SMS_R_System.OperatingSystemNameandVersion like “%workstation%” and SMS_G_System_COMPUTER_SYSTEM.DomainRole in (2)

PowerShell is King – Building a Reference Image Factory (v 3.2)

The Deployment Bunny

The Image Factory has been re-worked and updated. It also has moved to GitHub https://github.com/DeploymentBunny/ImageFactoryV3ForHyper-V/

Concept and flow

The idea is the same, we use MDT, create refimages task sequences that runs without any questions. A PowerShell script will grab all enabled Task Sequences in a specified folder, create a VM for each of them. Grab the Bios Serial number from each om them, update customsettings ini with that information, start the VM’s (number of concurrent VM’s determine how many VM’s can run at the same time, wait until all VM’s are done and finally removes all VM’s for a cleanup process. You can run the script as is (if you store it in C:SetupImageFactoryV3ForHyper-V on you MDT server), or you can open it in ISE and run section by section to see what happens.

The XML file (C:SetupImageFactoryV3ForHyper-VImageFactoryV3.xml)

Is a control file for settings, pretty straightforward, just make sure…

View original post 128 more words